
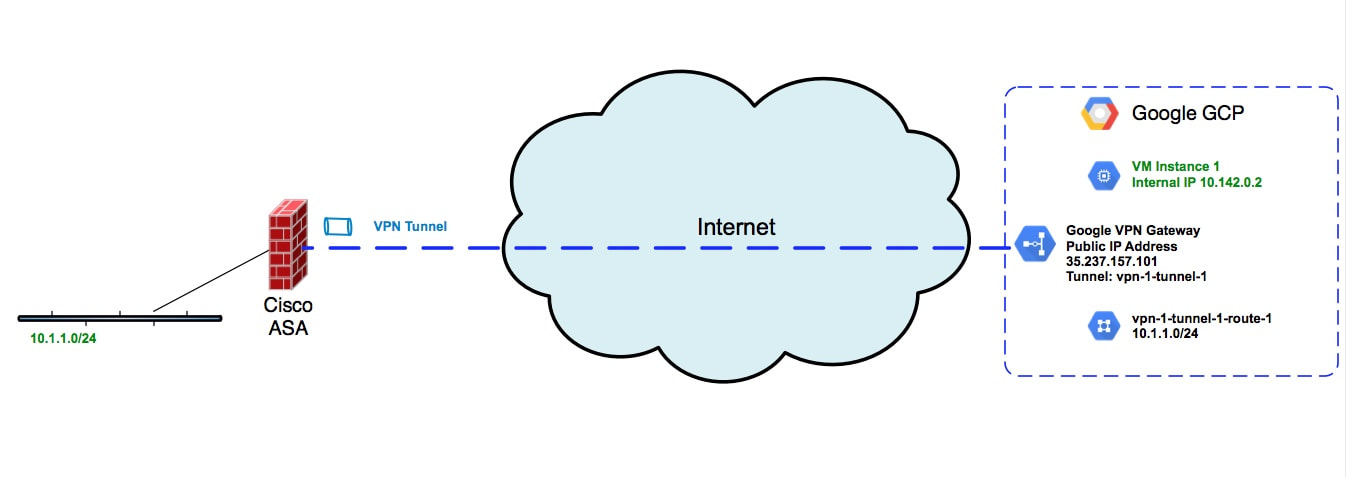
 Figure 1 - ASA VPN connection to Google GCP Figure 1 - ASA VPN connection to Google GCP This post will walk you through setting up an IPsec VPN connection between a Cisco ASA firewall and Google's GCP platform. Specifically this setup will implement route based IPsec VPNs between the firewall and GCP. First an aside on policy vs route based IPSec VPNs. Policy based VPNs, sometimes referred to as LAN to LAN VPNs, are an easier but a less flexible setup. With policy based VPNs, you define a policy which describes the traffic which should be encrypted and placed on the point to point VPN connection. You might see this referred to as "interesting traffic". Route based VPNs instead use IP routes with tunnel interfaces. Instead of using a policy defined with an access list, route based VPNs use either static or dynamic routes to dictate the traffic that is to be sent on the VPN tunnel. One of the main advantages of this approach is that you can have multiple VPNs connecting to various public clouds or VCPs and your routing protocol can define the traffic that traverses the different VPN connections. Lets step through a configuration of a Cisco ASA connecting to GCP using a route based IPSec VPN. The Cisco ASA needs to be running at least code version 9.7.1. The code snippet for the ASA configuration is show below. Note that this is using IKEv2 along with a pre-shared key. The main configuration difference from policy VPNs is that with a route based VPN, we use a tunnel interface. This tunnel interface is setup with a non routable ip address. Additionally, there is a static route which defines the route to a remote subnet within Google GCP. This route directs the traffic out of the VPN interface by pointing at the ip address assigned to the ASA's tunnel interface. Refer to Figure 1 for the network topology. ASA Configuration
On the GCP side a few things are required. We will be using the VPN connection setup located under the Hybrid Connectivity section of the GCP console. When you setup the GCP VPN connection the process will include the setup of a Google Cloud Gateway. This gateway will have an external ip address which will serve as the target of the tunnel from the ASA. The VPN tunnel on GCP will also ask you for the remote peer ip address which would be the "outside" interface of the remote ASA firewall. One key part of the setup is to select a "route based" vpn type within the GCP configuration as show in Figure 2. 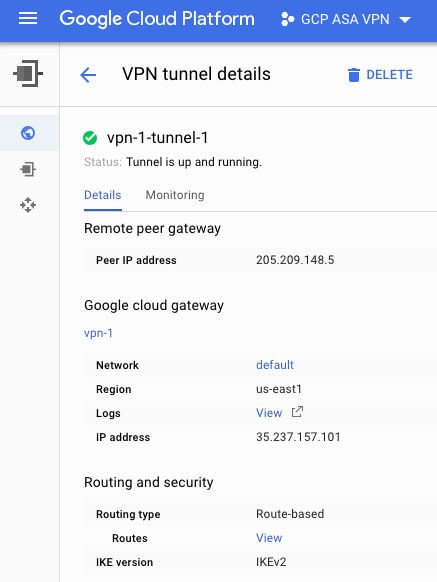 Figure 2 - GCP VPN Setup Since we are setting up a route based VPN we also need to include a route in the GCP routing table which defines how to reach the subnet behind the remote ASA. To do this go under VPC Network on the GCP Console and select Routes. Then select Create Route at the top. Add a route for the subnet behind the remote ASA which points at the name of the vpn tunnel we created in the previous step. See Figure 3 below.  Figure 3 - GCP VPC Route Setup As this point the IPSec VPN tunnel should be established between the ASA and GCP. To verify that the tunnel is active you can issue "show crypto ikev2 sa" on the ASA. If the tunnel is established you should see output similar to the below. The remote ip should reflect the public ip assigned to the GCP VPN gateway. Code Editor
Likewise on the GCP side you can go to Hybrid Connectivity and select VPN. If the tunnel is established you should see a green checkmark and "established" under the status column of the tunnel as shown below. 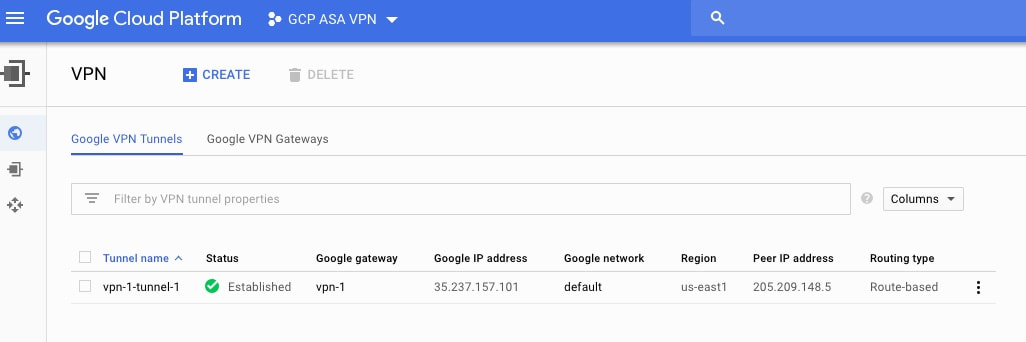 Figure 4 - VPN Tunnel Verification on Google GCP In the next post we'll walk through how to setup a hybrid public cloud VPN tunnel using multiple cloud providers. You would be able to have two tunnels from the ASA; one connecting to Google GCP and another connecting to Amazon AWS. Using route based VPNs, the ASA would then be able to securely provide connectivity from a local data center to remote public clouds using VPN tunnels for simultaneous connectivity and dynamic routing. The routing could be extended to use BGP instead of static routes.
|
Categories
All
|
 RSS Feed
